I can’t believe that my eldest daughter is turning 4 years old in a week! I still remember when I brought her home from the hospital and now here she is, going to kindergarten in a year, forming complex-(ish) sentences, and growing like a weed before my very eyes!
Since moving to a new town last summer, life has begun to reach a sense of normalcy. We are slowly getting into a routine and beginning to meet some people in the area. Since we had a really big birthday party for our daughter last year, we decided to keep it smaller this year, akin to the birthday parties that we used to celebrate growing up. I let my daughter choose five of her friends to invite so we can have an intimate party here in our new house. After committing to this type of party, I dug into the recesses of my memory to try and remember what kinds of activities we had at our birthday parties back in the day. I remembered that my mom used to make piñatas for us as an activity and we always had a lot of fun making them and then trying to break them. I thought it would be a fun activity to make a small piñata with my daughter as we had never done this before.
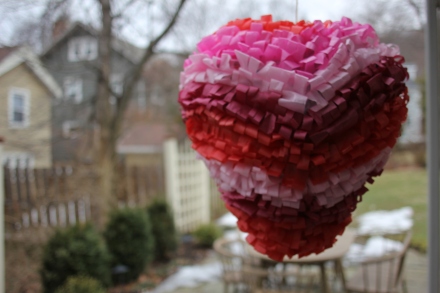
Surprisingly, when I told her the plan, she knew what a piñata was from one of the shows that she likes to watch. She got very excited that I knew how to make one and happily dove into helping me. I let her choose what she wanted, what color, and what candy to put inside it. she had such a blast making it. She loved the messy beginning where you paper mache the balloon and she was very excited as the piñata dried and began to take shape. I can’t wait to see her little friends and her trying to break this thing. I have a feeling the parents are going to get in on some of the action! This is going to be fun!
For those of you who have never made a piñata, it’s really quite simple. It only takes a little time:
Items needed:
balloon
kitchen twine
newspaper shredded into 1″ strips
1/2 C flour dissolved in 3 C water – should be a little thick
tissue paper
Elmer’s glue
candy
Step 1: Place the inflated balloon on a bowl to hold it still. Dip the newspaper in water/flour mixture and run the strip of paper through your fingers to remove excess water/flour. Place on the balloon. Continue until the entire balloon is covered in newspaper, about 2 layers. Set aside to dry completely.
Step 2: Once dry, tie kitchen twine around the balloon securely and tie a loop at the top of the piñata. This is where you will hang the piñata from. Continue to glue on at least 3 more layers of the newspaper and water/flour mixture. Set aside to dry completely.
Step 3: Cut tissue paper into 2″ strips. Fold in half and then cut along the folded side about 3/4″ inch down so that it is one long strip of tissue paper with parallel cuts along the folded edge. Do this for all the tissue paper you will attach to the piñata.
Step 4: Draw a line of glue along the piñata. Attach one side of the tissue paper along the glue and press down. Draw another line of glue along top of the tissue paper edge that you just glued. Fold the tissue paper over so that it forms a loop and glue the free edge on top of the first glued edge. Continue until the entire piñata is covered. Leave a small area on the top of the piñata so that you can cut a hole to fill with candy.
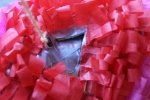 Step 5: At the top of the piñata where you have left it without the tissue paper, take a utility knife and cut a V-shaped slit. This will pop the balloon inside. Push the V flap in and push candy into the piñata until desired amount is in the piñata. Let the V flap close and tissue paper over it.
Voila! Your piñata is ready to party!


