Berry Berry Bread

IMG_5587

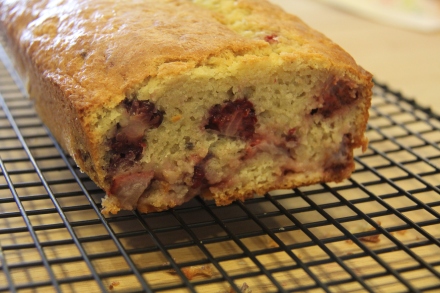
Happy Memorial Day to all!  I hope that you all had a restful and long week-end!  This week-end we decided to sequester ourselves in the apartment and try to potty-train my daughter.  It was a particularly blustery and overcast day on Saturday.  Perfect weather for hiding out in the apartment.  Since we were confined to the indoors, I decided to take the opportunity to make breakfast.  We happened to have strawberries and blackberries in our refrigerator, which I thought would make a delicious breakfast bread.  I used the recipe found in my previous post here  except I substituted strawberries and blackberries for the fruit/ nuts addition.

My daughter who just turned two, is growing by leaps and bounds every day now.  Her affinity for helping in the kitchen has not declined in the least so she was excited to help me make the bread.  Needless to say, everything she was doing came to a dead halt when she saw I was beginning to make something.  She stopped eating what she was eating, got off her chair, and pulled up her stool up to the island where I was working so she could see what I was doing.  So of course I let her help me mix the ingredients and add the berries, and together we watched the bread rise in the oven.  She even insisted on bringing my cookbook to the bathroom when she sat on the potty so she could “read” it!  She is a constant source of entertainment!

IMG_5591

This bread is a wonderful spring bread.  I loved the flavor of the berries mixed together.  I think I took it out of the bread pan too soon (out of eagerness) as gravity quickly began to pull it down and it ended up in quite a squat form.  Despite it being one of the uglier breads I made, it was still delicious.  The berries were piping hot and very fresh, so the bread had a wonderfully bright sweetness to them.  My daughter and husband quite liked it and I have to admit that these impromptu breakfast breads are quite tasty and fun!

A Kitchen Extravaganza – Part 3

IMG_5402

First of all, I hope you all had a wonderful mother’s day!  Congratulations to all the mommies out there for doing such a wonderful job with your kiddies!  The best mother’s day gift I had was coming out of the bathroom and having my daughter walk up the stairs, see me, and say “Happy Mother’s Day!  I love you!”  What a little dear!

My goodness!  This kitchen really took some time to make!  You can follow the progression from my previous posts here and here.  Living in a small apartment with limited space really makes it difficult to craft a larger project and not have it become a hazardous area for your toddler!  I must say I’m very pleased with the result.  Even before I started adding coats of paint to this to make the kitchen look nicer, my daughter was thrilled at having a kitchen.  It just goes to show you the power of a child’s imagination.

Unfortunately, I made the mistake of leaving some sharpies out one morning and my daughter ended up drawing all over the freshly painted stovetop.  Alas, the red paint I got can’t seem to quite cover up the sharpie marker…. man those things are permanent!

IMG_5410This entire project cost me about $30 for some knobs, a p-trap for the faucet, and paint.  Everything else I had on hand.  I wanted to make an oven because my daughter got an adorable cupcake and cookie set that came with oven mitts.  No kitchen is complete without a sink.  I used an small stainless steel mixing bowl I had on hand.  Since I was making this, I measured to make sure everything she owned would fit in this: sushi kit, stir-fry kit, cupcake kit, and cookie kit.  I’m very pleased with the results and my daughter has already had endless hours of fun “cooking” for us.  I just hope it stands up to the abuse.

Here are some more pics of the finished product.  I hope you enjoy!

IMG_5407

Top view of kitchen

IMG_5400

Diagonal view of the stovetop

IMG_5401

View of sink: the faucet swings back and forth

IMG_5399

Oven with storage drawer below

IMG_5395

Front view of overall kitchen

Specs on the kitchen:

Measurements: 24″W x 12″D x 32″H

Sink: small stainless steel mixing bowl w/ a lip

Oven door: window is plastic from a cheap $3 Ikea frame I had on hand

Drawer: leftover box from the Melissa & Doug cupcake set

Stove knobs and faucet knobs: larger ones are pot handles I got from the hardware store

Small knobs: extra pulls that I didn’t need from my Ikea bedstands

Sink Faucet: p-trap from hardware store – I screwed the p-trap into the ring and glued the ring to the countertop so the faucet actually swings around like a real faucet.

Bar for hooks: plastic LED fixture cover I had as a sample from work

A Kitchen Extravaganza – Part 2

IMG_5410

Well, I finally mustered up enough motivation to take a look in our basement for materials to build a play kitchen for my daughter.  We live in an apartment building with a communal trash/recycling room and there are always lots of cardboard boxes on hand.  I thought to myself “what a great use of free resources!”  I pilfered heavily from the basement and for the next two days our apartment’s living room looked like the trash room.  I think I may have stressed out my husband and my mom (who was staying with us at the time).  My daughter thought it was the next amusement park though.  She had a blast playing with scraps as I cut, measured and glued stuff together.  It reminded me a lot of my architecture school days building models hour after hour.  It was actually quite fun.

IMG_5372Based on my previous post, I had a pretty good idea of what I wanted this kitchen to incorporate.  It needed an oven, stovetop and a sink.  Once I figured this out, I had to think about how I proportionally wanted it to look.  Being an architect, I drew a plan, front elevation and side elevation, thinking of the easiest way to accomplish this without any unnecessary hardware or additional bought items. (Sorry for the shoddy photos, my sketches got a little messy from use…)

Of course my first pass wasn’t perfect.  My first iteration had the oven door as the full left side panel.  This resulted in the door opening, being too deep for my daughter to reach into, and her stepping on the door to put anything into the oven.  She ended up not liking it so much and didn’t ever want to use it.  Also, she somehow accumulated all of these utensils and other items and had nowhere to put anything so it turned into a hazard zone where you had to be careful not to step on a fork or other item.  I decided to cut the door down and add a drawer in the bottom.  This was exponentially better as she immediately took to putting things in the drawer and taking them out.  Also, the door to the oven shortened so she no longer was in danger of stepping on it and breaking it.  This little add made the kitchen that much more useable and “real”.

Above is a sneak peek of part of the kitchen in it’s finished state.  Stay tuned for more to come!