Eraser Fun

IMG_7708

My eldest daughter really loves art projects.  Give her an art pad and some colored pencils or crayons and she will be entertained for a good hour or more by herself.  Since she tends to have such an affinity for drawing or art projects,  I am always looking for new ideas of things to do to keep her interested.

My cousins came for a visit over the summer and not only did they bring some awesome colored pencils,  paper pad and stickers, they also brought a really cool make your own eraser kit!  Within the compact plastic case, you saw pristine squares of soft colored rubber waiting to be molded into whatever your imagination and hands were capable of.  She was so excited when she got this gift that she proceeded to show it to me every day until I said we had time to do this project. I finally relented after a couple of days (so this post has been a long time coming!)

IMG_7711

The cool thing is this material is a lot like play-doh except once you are done,  you bake it in the oven and it will harden into an usable eraser. When I asked her what she wanted to make,  she immediately decided on a pink piggie.  Pink is one of her favorite colors right now so I’m hardly surprised she found a way to use the pink first.

I busted out a 1/2″ diameter wood dowel, some toothpicks, and a plastic for and knife to use as shaping tools for our projects.  I decided to make a purple dinosaur (not Barney)!  It was quite fun and as you worked longer with the original material, it became more pliable and moldable,  although it did get stickier as well.

I helped my daughter get the shape just right after her first go of it by herself. I showed her how to add a hole in the bottom so you could mount it on a pencil, how to attach limbs, etc.  It was very similar to working on a clay sculpture.  I think that the end results are super cute and my daughter had such a great time making these.  I can’t wait for round two!

Happy First Birthday!

image

Last weekend marked the first birthday of my youngest daughter.  I can’t believe how quickly time flies! I can hardly remember what happened during this whirlwind of a year.  It is true that as you get older,  time seems to speed on by even faster than before. There are so many things that I wished would move more slowly so that my ability to really enjoy the moment and memorize each precious memory is forever stamped in my mind.  Nothing can ever compare to these precious moments.

We kept the party strictly to family,  which is quickly already becoming a bigger affair as everyone’s families are growing larger!  I made the same cupcakes that I had made for my eldest daughter’s first birthday,  only I omitted the lemon from the cake batter and the icing for just plain vanilla cupcakes.  I think she really liked them, she gobbled them right up!

image

Things always seem much more rushed for the second child so I was only able to make a quick backdrop for decorating for the party.  Nonetheless,  it was a festive and happy time and my daughter got lots of gifts. For the backdrop, I ended up taping the remainder of a plastic pink tablecloth to the wall. Then I ran chevron streamers from top to bottom in stripes. I lined the top with crepe paper tassles and heart balloons, then I affixed my trusty birthday banner on top for the finishing touch.

Happy birthday my dear little baby.  Please don’t grow up too quickly!

Panda Party

IMG_7305

My daughter recently celebrated her fourth birthday.  As a part of her birthday, she asked if she could bring cupcakes for her classmates.  I don’t mind bringing goodies for the kids to celebrate a birthday.  I actually think it’s quite nice and fun for the kids to be able to celebrate something in school and I know that my daughter was so excited to turn four like all of her friends.

I wanted to make something special for her so I looked at my trusty pinterest and found the cutest pin of a panda cupcake.  The link didn’t work but the images were enough for me to be able to figure it out for the most part.  I didn’t have a lot of time so I decided to use a cake box mix and dress up the cupcakes really cute.  When my daughter saw the panda cupcakes I had started before she went to bed, she was very excited, exclaiming how cute they were.  When she woke up in the morning, she saw all of the panda cupcakes and excitedly said “Mommy, there are so many more cute pandas!”  She couldn’t wait to share them with her friends at school.  I hope it was a memorable celebration!

Buttercream frosting

1 C butter, softened

4 C confectioner’s sugar

1 tsp vanilla

1 T milk

Combine all ingredients in a bowl and beat until well incorporated.  If the mixture is too thick, add more milk.

Ingredients:

Buttercream frosting

Icing piping bag with a wide circular tip

small bowl of granulated sugar

semi-sweet chocolate chips

chocolate sprinkles

Instructions:

1. Bake chocolate cake batter in mini cupcake tins, as directed.

2. Using your icing piping bag, pipe the frosting onto a cupcake, as smooth as possible.  I piped from the edges and moved into the center and then piped extra icing in the center to really give the cupcake a rounder shape.

3. Taking the iced cupcake, roll the icing in the granulated sugar until completely covered.

4. Starting with the nose, place a chocolate chip sideways a little lower than the center of the cupcake.  Follow with two chips with points down as eyes and then two chips with flat side facing up as ears.

5. Using tweezers, place the chocolate sprinkles to form the mouth.

6. Using a very thin piping tip, squeeze small dots onto the eyes.

Voila!  You have cute little panda cupcakes that are fun to look at and yummy to eat!

IMG_7306

Dressed to the Fours

IMG_7595

This week-end was my eldest daughter’s fourth birthday.  I cannot believe that she is four already! Time really is flying and if you blink, things seem to just zip on by!

This was the first birthday party that we were going to have at our new house.  Life is finally starting to settle down and reach a routine and nothing marks an important milestone like the first birthday party in the new house!  I have been to many types of birthday parties and I have to admit that the thought of throwing a birthday bash for a class of 20 children was extremely daunting.  I decided instead to opt for a smaller, more intimate party, similar to the birthday parties I had as a child.  I told my daughter that she could invite four of her friends, one for each of her four years.  It ended up being five friends, which was still manageable.  I thought this would be much more personal and would give the parents an opportunity to get to know one another in a more relaxed atmosphere.  Days are crazy enough with school drop-offs and pick-ups that we never get any opportunity to see any of the other parents, much less talk to them!

We started preparing for the party weeks in advance. My daughter told me she wanted a princess party that was pink, purple and blue.  She wanted to have each of her friends come wearing a princess dress to do princess activities. You can recall in my previous post that my daughter and I had made a heart pinata. For some reason the thought of a bunch of 4-year old girls dressed up as princesses trying to bust open a pinata was so hilarious that it immediately went on the To-Do list.  I figured you couldn’t have a princess party without wands, so I set up an activity for each girl to make their own magic wand.  Since we were doing hearts as a theme, I ended up making heart-shaped “princess” cupcakes.  And finally, I thought, what better way to end the party, than with a special princess goody bag, which was actually a Chinese brocade jewelry bag that held all sorts of little goodies for the girls!

The nice thing about having a house and having no furniture is that you can designate a “party room” and you don’t have to worry about shuffling things around.  We spent Saturday afternoon decorating the room.  We made balloon streamers and crepe paper tassle buntings, and I made a curtain out of streamers as well.  All in all, the room was very festive and the party was a great success!  I think all the little princesses had a great time and I was correct that watching a bunch of princesses earnestly trying to crack open a heart pinata was pretty funny.  I think that the parents had a lot of fun helping to break that thing too!

IMG_7602

Tassle bunting – tutorial here

IMG_7608

Streamer Curtain – I used the same technique as a photobooth wall and just added tie-backs, tutorial here.

IMG_7532

Princess Heart Cupcakes – I was inspired by these images of cookie designs as well as zentangle designs such as these.

IMG_7614

Magic Wands – I wrapped a 1/2″ wood dowel in white grosgrain ribbon and secured with hot glue.  Then I attached some curling ribbon, where each girl selected a color, and finished it off with a silver glitter snowflake ornament.

3 for 3

IMG_6417

My daughter just turned 3 years old! I cannot believe how fast time flies. It feels like just yesterday I was holding her in my arms for the first time and marveling at how perfect she was in my arms and how reliant she was on me for everything! Now, I can barely hold her and she’s become so independent.  Now, I don’t know about you, but many of my daughter’s friends were born around the same time as her.

We have officially reached birthday season! It’s always a little bit of a challenge to throw a birthday party that won’t conflict with two to three of her other friends. So, the moms of the 3 musketeers decided to throw a joint 3-year old birthday party, since many of their friends overlap. We didn’t have a particular theme, although we had decided on spring colors. When asked what she wanted to do for her birthday, my daughter said she wanted “purple ballerinas”. Huh. Is that right. Okay…..

So, purple ballerinas for her cupcakes it was!  I racked my brain for how to make a purple ballerina cupcake.  I thought “well, maybe I can get a cupcake topper?”  I searched for all sorts, like little doll toppers, ballerina toppers, etc.  Most of them were in pink , but I figured I could use purple cupcake liners and then use a pink topper and it would still be okay.  I finally settled on the following liners and edible cupcake toppers.  For the cupcake recipe, I decided to be a little different and go with a strawberry cupcake instead of a traditional vanilla or yellow cupcake.  I found a great recipe on Martha Stewart here and I opted for a very simple buttercream frosting recipe.

When my daughter found out I was making birthday cupcakes, she was very excited.  She helped me to decorate the cupcakes.  I made the cupcakes the night before and the day of the party, I made the icing, iced the cupcakes, and had her press on the toppers for the party.  She was very into it and especially loved helping us pack the cupcakes away as she would get icing on her hands and get to lick it all off.  Once they were packed and we got to the party venue, she immediately wanted to have a cupcake!  Well, I’m glad she was so excited.

The party was a big success!  I will have to write another post for it as there was so much going on. I’m sad to say we didn’t take a lot of pictures.  Seeing as how we had in excess of 20 children under the age of 5, it was a little bit hectic.  Well, you only turn 3 once!


A Cry for Spring

IMG_6401

The weather report going this week-end was not good. There was a prediction for more snow and cold weather. Now, normally, I don’t mind snow. But pushing a stroller in snow while pregnant is not an easy task. I was both excited and apprehensive for the snow, which put me into a strange kind of nesting mood.

My kitchen on Sunday was a hub of activity. I must be getting my energy back because I ended up making a bowl of guacamole, two dinners (one for Sunday and one for Monday) with plenty to spare, and then I decided to make a breakfast bread. I haven’t been baking in quite a while, just simple things here and there. I did make a pound cake two weeks ago and it was so nice to have a staple breakfast food again that I thought I should make another today.

The mix today was a strawberry lemon poundcake Generally, I like to use lemon when I feel spring coming on. A bit of lemon zest just adds a nice, fresh zing to anything, and to me, it is so reminiscent of spring. As for the strawberries, I happened to have a handful leftover from what my daughter didn’t eat. I was a little skeptical about using strawberries because I just find that their flavor is so subtle in baking that you sometimes don’t notice it. Oh well, waste not, want not. I ended up using my staple pound cake recipe.  I made this a double recipe so that it would fill a large bundt pan.  When I got to the pouring of the batter, instead of mixing the strawberries into the batter (I was afraid the weight of the berries would cause them all to fall down to the bottom during baking) I poured in half the batter, then I sliced the berries and lay them in into the batter, nuzzling some a little deeper in, then pouring the rest of the batter on top.  It’s kind of like how you make a coffee cake with the cinnamon filling in the center.

Well, the moment this came out of the oven, my daughter wanted some.  The smell of the lemon with the strawberries was subtle yet intoxicating and when I cut it open to get a better look, I was pleasantly surprised that it turned out better than expected.  I cut a piece for my daughter, sampling a little myself and she devoured it.  My husband noted that the strawberries added just a hint of sweetness that complemented the lemon quite nicely.  I think this one’s a winner!

Happy Holidays from Us to You

IMG_6353

It is officially the holidays! This means decorations, presents, and most importantly, holiday cookies! I try to make holiday cookies every year, but I skipped last year since we spent the holidays in Seattle with my parents.

With the holidays upon us, and my daughter being of an age that actually is conducive to some tasks, I was thinking that making holiday cookies would be so much fun.  Last year, my office holiday party had a room that was dedicated to cookie decorating for all of the kids and it was a big hit with my daughter.  They had prepared cookies, icing, and tons of different sprinkles, candies and such to decorate you cookie.  Then, they had little individual clear bags to wrap your decorated cookie in and take home.  I thought this would be fabulous to try at home.  And, fortuitously, the mommies of the three musketeers, decided that we would all get together and have a cookie-decorating session for our daughters. I (of course) got super-excited and immediately when and bought all the cool holiday sprinkles online at Amazon that I could find (I couldn’t resist).

Well, the big day rolled around and my daughter was very excited to go to her friend’s house to make cookies, but lo and behold, the fates were not with us.  She woke up that morning with a weird barking cough and a mild fever.  The doctor told us she had croup (again).  Bother.  I already had all the ingredients for cookies, icing, and the sprinkles to boot!  Well, I wasn’t going to let a little croup hold me back, especially when my daughter threw a fit when she found out she wasn’t going to her friends house for cookie festivities anymore.  I took it upon myself to do a mini-session a home to appease both of our cookie cravings.

IMG_6352

While this was a little bit messy (I think we’ll be finding sprinkles throughout the apartment for a long while – those things really do travel well across a wood floor!) she had a wonderful time and we ended up with a ton of home-made gifts for friends.  I would definitely recommend this as a kid-friendly and affordable activity to do at home, especially when it’s snowing non-stop outside (like it was when we made the cookies).  Happy Holidays to everyone!

IMG_6358

An Apple-demic

20130922_072758

It has really been a long while since I’ve posted! I can’t believe that the summer is gone already and that fall is upon us! While I lament the passing of the warm sunny days and going to the swimming pool, there are certainly many aspects of fall that I look forward to. One of the best things about fall, in my opinion, is the official arrival of apple season!

Now, I don’t know if my readers know, but I grew up in Saudi Arabia. While this may not seem relevant to fall, let me give you a bit of background. I grew up knowing three types of apples: Red Delicious, Golden Delicious, and Granny Smith. I didn’t know that there were any other kinds. Imagine my surprise and delight when upon moving to the Northeast, I discovered endless varieties of apples to be had! Fuji, Gala, Mutlu, Macintosh, Spartan, the list goes on and on!

Since our CSA runs through October, we are naturally partaking in the apple festivities!  Not only do we get fresh-pressed apple cider, we get bags and bags of apples!  We were literally overflowing with apples!  As a bonus, we also got a bag of Barlett pears!  I love my pears!

Well, what would you do with more apples that you can consume?  Why, make a pie, naturally!  AND, it happened to be my little brother’s birthday, so why not make TWO pies?  I know, crazy, right?  It was like a pie factory in our apartment!  My daughter had lots of fun helping.  While she didn’t get to wield a knife (she’s only 2.5!) she did enjoy helping me put all the apples into the bowl and then mixing the apples in the sugar mixture.  She also enjoyed eating the apple filling out of the mixing bowl as I rolled out the crusts.

The pies kept our apartment smelling delicious with the aromas of cinnamon, nutmeg and apples, which is a perfect way to welcome fall into our house.  Happy fall everyone!

Apple-Pear Pie

Filling:

1 1/2 C Bartlett Pears, peeled, cored and chopped – about 3 med-sized pears

2 1/2 C apples (whatever variety) peeled, cored and chopped – about 6 small/med-sized apples

1 C granulated sugar

1/2 tsp cinnamon

1/8 tsp nutmeg

2 T flour

Crust (makes top and bottom crust):

2 C flour

2/3 C shortening

1/2 tsp salt

6 T cold water

1. Preheat oven to 375 degrees.  Mix all ingredients for the filling in a large bowl.  Let sit.  The mixture will accumulate water as it sits.

2. Cut shortening into flour and salt until you have coarse crumbs.  Add cold water 1 T at a time, mixing as you go.  The dough will be ready when it pulls away from the bowl and is smooth.

3. Divide dough into two even pieces.  Roll out one piece into a large circle so that it is larger than the pie dish.  Place in the bottom of a glass pie dish so that it comes up the sides with about 1/2 and inch of overhang.  Use a fork to punch holes in the bottom of the crust.  This will help ensure that when the pie is baking, the crust won’t form bubbles.

4. Pour filling into pie crust in dish.  Roll out the other pie crust so that it is at least a inch larger than the pie dish.  Fold into quarters and use scissors to cut vents into the top of the crust.  Take the crust and fold the edges to seal the bottom and the top crust together.

5. Cover the crust edges with aluminum foil.  Place a covered sheet pan on the rack below the pie rack.  Place pie in the oven and bake for 25 minutes.  Take off the aluminum foil and bake for 25 more minutes.  Take out the pie and let cool.

A CSA Experiment

IMG_5849

Well, it’s that time of year again where our CSA finally begins! I’m always excited to see what interesting produce we will get. For those of you who don’t know what a CSA is, it stands for “Community Supported Agriculture”. It’s a seasonal affiliation where a farm will provide you with weekly seasonal produce for a lump sum for the season. It’s a great way to support local farmers as well as get fresh, seasonal produce in the process! The wonderful thing about where we live is there are many opportunities to do this and there are many different types of CSA’s. There are ones that are all produce, some have meat, eggs, breads, and also flowers!

This time we received a quart of black currants. Now, I can honestly say that I’ve never had a currant in my life. I had no idea what they tasted like nor how to prepare them or what to do with them. I tried one and it was surprising. I had always expected it to be sweet, like a cherry or a grape. It was actually more of a tart, musky/ salty flavor. The skin was thicker and the inside was akin to a tomato, having a sac of seeds surrounded by juice.

I found a lot of recipes using currants in jams or cakes. I thought that making a pie with these would be great but I didn’t have enough. I figured with the flavor, it may go well with mangoes, which I just happened to have in my freezer. Now, I have tried to bake before with mangoes, but I have found that the best bang for your buck is to keep a bag of frozen mangoes in your freezer and use those for when the baking bug bites. So, mango currant bread. Instead of using my usual go-to quick-bread recipe, I decided to use the pound cake recipe base and add the fruit. Since the currant is not quite as sweet, I thought that the pound cake recipe’s sweetness and the sweetness from the mangoes would help balance the tart, saltiness of the currants.

Let me tell you, this recipe is delicious. The baking of the currants really ripened the flavors so that the sweetness from the cake and mango are nicely punctuated with the tangy and tart flavor of the currants. I love how baking is a universal medium for ingredients! My daughter immediately wanted a slice and then proceeded to pick out all the currants. She also really like the currants raw and was trying to eat them all as I was mixing up the batter. What a little consumer!

IMG_5854

Mango Currant Bread

1 stick butter, softened

1 1/2 C granulated sugar

1/2 tsp vanilla

3 eggs

1 1/2 C flour

1/2 C heavy cream

1 C black currants, washed

1 C frozen chopped mangoes

Cream together butter and sugar. Add vanilla and beat eggs in one at a time. Add flour in half cup increments, beating as you go. Add heavy cream and whip for 5-10 minutes until the batter is very smooth and fluffy. Fold in currants and mango. Oil or butter a bread pan and pour the batter into the pan, spreading evenly. Put the bread in a cold oven and bake for 90 minutes at 350 degrees or until a cake tester comes out clean. Take the bread out and let it cool for 30 minutes on a wire rack. Use a spatula to loosen it from the bread pan and set it on the wire rack to cool completely.

Berry Berry Bread

IMG_5587

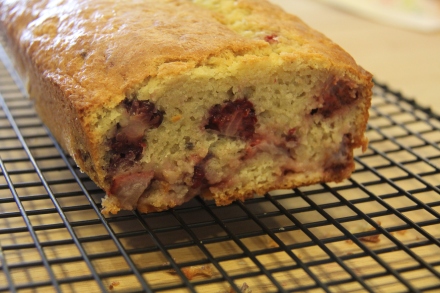
Happy Memorial Day to all!  I hope that you all had a restful and long week-end!  This week-end we decided to sequester ourselves in the apartment and try to potty-train my daughter.  It was a particularly blustery and overcast day on Saturday.  Perfect weather for hiding out in the apartment.  Since we were confined to the indoors, I decided to take the opportunity to make breakfast.  We happened to have strawberries and blackberries in our refrigerator, which I thought would make a delicious breakfast bread.  I used the recipe found in my previous post here  except I substituted strawberries and blackberries for the fruit/ nuts addition.

My daughter who just turned two, is growing by leaps and bounds every day now.  Her affinity for helping in the kitchen has not declined in the least so she was excited to help me make the bread.  Needless to say, everything she was doing came to a dead halt when she saw I was beginning to make something.  She stopped eating what she was eating, got off her chair, and pulled up her stool up to the island where I was working so she could see what I was doing.  So of course I let her help me mix the ingredients and add the berries, and together we watched the bread rise in the oven.  She even insisted on bringing my cookbook to the bathroom when she sat on the potty so she could “read” it!  She is a constant source of entertainment!

IMG_5591

This bread is a wonderful spring bread.  I loved the flavor of the berries mixed together.  I think I took it out of the bread pan too soon (out of eagerness) as gravity quickly began to pull it down and it ended up in quite a squat form.  Despite it being one of the uglier breads I made, it was still delicious.  The berries were piping hot and very fresh, so the bread had a wonderfully bright sweetness to them.  My daughter and husband quite liked it and I have to admit that these impromptu breakfast breads are quite tasty and fun!